A number of functions provide advanced color choices through My Memories Suite's Choose Color dialog.
The Choose Color window will open when you:
• Click on the Change button in the Text or Shapes sections of the Control Panel.
• Choose the Color category in the Background Papers section of the Control Panel.
• Click on the Color box or Change... button when adding a shadow to a photo, a shape, or text.
• Click on the Color box or Change... button in the Mat Properties dialog for shapes or photos.
• Click on the Change button in any of the Word Art Designer sub-sections.
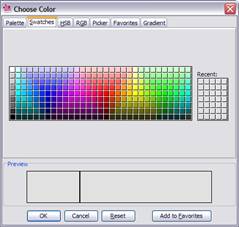
The easiest way to select colors is to click on one of the color squares on the Palette or Swatches tabs.
For this or any other method of choosing colors, the Preview area will show the chosen color; the color on the left (or top for Word Art) is the original color and the color on the left (bottom for Word Art) is the newly selected color.
HSB (short for Hue, Saturation, and Brightness) is useful for adding or removing white, black, and gray in the color, as well as lightening and darkening a color.
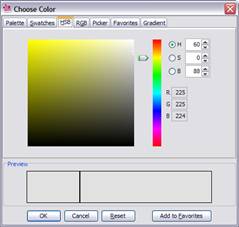
• Move the slider next to the color bar up and down to choose the desired hue or type it into the H field.
• Click on the circle in the large color box and drag it around to add or remove white, black, and gray.
• You may type values directly into the HSB boxes, or click on the up and down arrows next to the box.
RGB (short for Red, Green, and Blue) is a standard method of choosing colors.
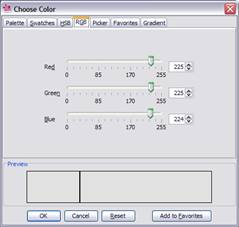
• Move each slider bar (Red, Green, and Blue) back and forth to add or reduce the amount of each color in the composite color.
• An absence of the color is 0, while 255 represents the maximum amount of that color.
This tab allows you to pick a specific color that is on the current page.
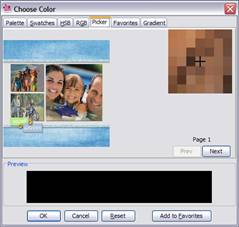
• Move your mouse around in the page preview area at the top left of the tab.
• The zoom area at the top right of the tab will show a pixel by pixel view of your cursor's position in the preview area.
• To select a color, move the mouse around in the page preview area and click (left mouse button) when the black crosshair is over the color you would like to select. The color will now appear in the Preview area at the bottom of the window.
• To select a different color, repeat the last step by clicking when the crosshair is over the desired color.
• If the current page does not have the color you want, click on the Prev or Next buttons to move to a different page.
My Memories Suite allows you to store your favorite colors.
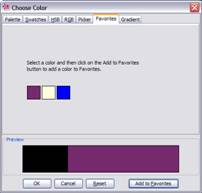
• To save a color to the Favorites tab, pick a color on any of the other tabs and click on the Add to Favorites button.
• My Memories Suite will store up to 20 favorite colors. After you have used all 20 slots, the oldest color will be removed the next time you add a new color to your favorites.
• To choose a color from the Favorites tab, click on the color square.
This tab, which only appears if you have chosen a gradient fill for Word Art, allows you to add a multicolor gradient.
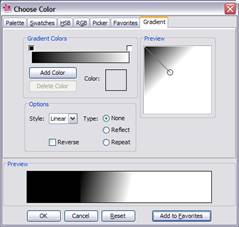
• Change the colors on the Gradient Colors bar by first selecting one of the small squares of color above the gradient bar. Then click on the larger Color square below the gradient bar (this will open a new Choose Color window with no Gradient tab).
• Add colors to the Gradient Colors bar by clicking the Add Color button.
• Delete colors from the Gradient Colors bar by clicking on the small square of color above the bar and clicking the Delete Color button.
• Click and drag on the circles in the Preview area to manipulate your gradient. If you click in the Preview area, the nearest circle will jump to your mouse. You can get a circle back into the Preview area if you've moved it out of the Preview area by clicking in the Preview area near it.
• Use the Style drop-down menu to choose between Linear and Radial gradients.
• Change the type of your gradient to Reflect or Repeat to have it repeat.
• Click in the Reverse box to use the colors in the Gradient Colors bar in reverse order.
After selecting the desired color in any of the tabs, click OK.